Wednesday, 22 October 2014

Photo Manipulation: Cyborg or Android, Starting out

For this task we need to manipulate a photo to create a cyborg or android image.  I really wanted to create a Cyborg Chicken for this task, but realised that I had lost my photos due to a hard drive crash.

Unfortunately I also didn't have the time to try to track down a chicken to photography, so was left with not much choice of subject- aside from myself!  I decided that I would need to use one of the self portrait photos I took earlier in the year.

In class we were shown a couple of tutorials online on cyborg photo manipulation.  To me though, saying these were cyborg was a bit of a misconception, as the finished images seemed more Android. Because of this I started off by thinking about Cyborgs and Androids, the differences between them and and what their purpose in society would be. 

I define Cyborgs as originally organic lifeforms which have been augmented by technology. Androids however I consider to be machines (robots) which are created to simulate the appearance of organic life.  

For both I can see a few reasons for each to have a purpose in society.  Cyborgs could be created either with the idea of replacing lost limbs or organs to preserve or improve life; or as a means of enhancing people or animals for a particular purpose- most likely for violent reasons such as soldier enhancement.  

Androids are created solely for a purpose by society.  Their purpose could definitely vary, and could be anything from providing companionship, to once again more violent purposes.

These are important as the purpose will significantly affect the design.  

I drew a few really quick design sketch ideas, while thinking about these points.
Figure 1: Initial design roughs

Next I began to track down some tutorials and speed paintings for inspiration.  Of those that I looked at my favourite final result was this image from Oliver Wetter.

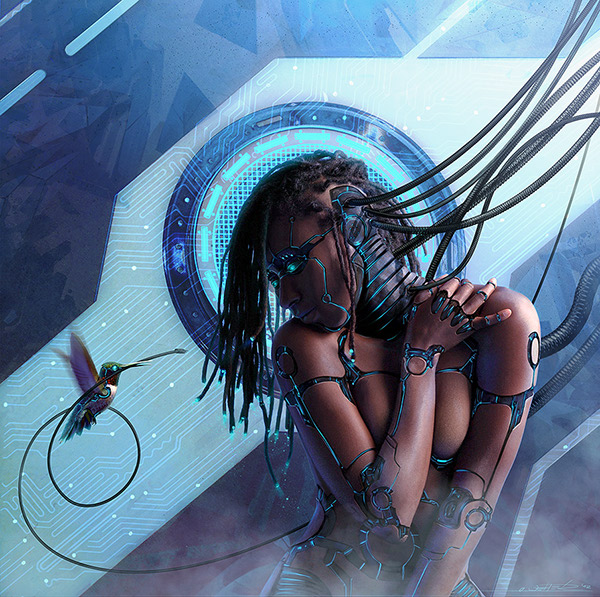
Figure 2: Android Legacy: Messenger II. Oliver Wetter. (n.d.). Digital Art. Retrieved from http://www.photoshoplady.com/tutorial/making-a-robotic-effect-for-a-human/6003   
What I like about it is how well the artist works with the form.  In many of the other examples the artists sometimes attempt to follow the form of the body, but end up not being as successful.  This work is a bit different in technique as well, as rather then using the pen tool like most other examples the design is hand drawn.  I also liked the incorporation of the hummingbird.   


This is the first example I found using a photo of a man. 

Puzzle: Final


My Completed Puzzle! Yay!

Puzzle: Development

I decided that my composition was missing something so started exploring some variations.


Playing with the scale and position of the Dragon and the Sheep slightly also helped me to finalise my composition.

With this locked down I began cleaning up the line-work and painting my puzzle.

Cleaning up the dragon

Figuring out tones through blocking
Colour Blocking
Adding Details


Puzzle Inspiration: Illustrators

For my puzzle I want to use a more painterly style than in my previous work.  I want to stay away from using photo textures and concentrate on presenting the scene through it's composition and bright colours.  I want to use quite bold colours in this design as it is intended to be family friendly, fun, and a little quirky

I decided to do some research into different Illustrators for inspiration, and managed to find some with a style I feel complements my own and gives a similar feel to what I intend for my puzzle.    

Izzy Bean: 

These illustrations by Izzy Bean make use a quite bright colours, but also have a softer look do to the lack of dark outlines seen in some of her other work.  I feel that this also contributes to the more painterly look of these particular images.  The technique of using the same colour in a darker shade for outlines can also be seen in places in her work- this is a technique that is also seen in Nickelodeon animations, so is also popular in the animation industry for children's shows. 

Izzy Bean's colouring style- especially in figures 1 and 3, gives a looser and more painterly look to the image.  One thing I do notice about these images is that they seem a little flat.  In these images the focus is clearly on the characters, with less emphasis on backgrounds or environments.  This is exaggerated by the images' softness- as they do not have a lot of tone contrast.

These are definitely images that I can draw inspiration from.

Freddie the Bear
Figure 1: Freddie the Bear. I, Bean. (n.d.). Retrieved from http://www.childrensillustrators.com/illustrator-details/IzzyBean/id=1896/slideshow/pag=10/
Autumn bears
Figure 2: Autumn Bears. I, Bean. (n.d.). Retrieved from http://www.childrensillustrators.com/illustrator-details/IzzyBean/id=1896/slideshow/pag=38/

The Selfish Shellfish
Figure 3: The Selfish Shellfish. I, Bean. (n.d.). Retrieved from http://www.childrensillustrators.com/illustrator-details/IzzyBean/id=1896/slideshow/pag=1/


Kristin Varner:

Kristin Varner's work is decidedly quirky, with bright colours.    Kristin's work makes use of simple shapes to create characters which have a lot of personality.   The backgrounds are often slightly of kilter, sometimes with intentionally skewed perspective, but they have quite a lot of depth to them.   Most works tend to have a slight texture to them.

Let's Camp!
Figure 4: Let's Camp!. K, Varner. (n.d.). Retrieved from http://www.childrensillustrators.com/illustrator-details/kristinvarner/id=1451/slideshow/pag=1/

MacMillan/McGraw Hill
Figure 5: MacMillian/ MacGraw Hill. K, Varner. (n.d.). Retrieved from http://www.childrensillustrators.com/illustrator-details/kristinvarner/id=1451/slideshow/pag=29/
Harry the Sofa King
Figure 6: Harry the Sofa King. K, Varner. (n.d.). Retrieved from http://www.childrensillustrators.com/illustrator-details/kristinvarner/id=1451/slideshow/pag=27/ 


Gill Guile

I love the watercolour look of these images by Gill Guile.  The expressive characters and colour palettes of these images really give then that extra something.
elephant, parrot and monkey
Figure 7: elephant, parrot and monkey. G, Guile. (n.d.). Retrieved from http://www.childrensillustrators.com/illustrator-details/Guile/id=1503/slideshow/pag=9/


SHHHHHH!
Figure 8: Shhhhhh!. G, Guile. (n.d.). Retrieved from http://www.childrensillustrators.com/illustrator-details/Guile/id=1503/slideshow/pag=23/


The colours of the dragon in figure 8 are really similar to what I had planned to do for my dragon.


Puzzle: Draft and Research

After some thought about my puzzle ideas I decided that I would go with my first design concept- the dragon relaxing with a cup of tea.

While I really liked some of the other concepts I felt that this was the best fit for the brief and also quite a fun idea.

I began to experiment with different background elements and, because I liked them so much, decided to incorporate my sheep into the background.

Figure 1: Puzzle Concept

I decided it was a good time to experiment with some very rough colour, and try to create a mood.  I experimented with quite bright colours as I felt these would best suit the mood of the scene.

Figure 2: Colour Concept 1

Before finalising my design and linework I began to do some research to further expand on the idea. I left this until after deciding on my initial concept as I didn't want my ideas to be too influenced during the early stages of development.

Illustrations with Tea Parties:
The Mad Hatters Tea Party - matthews, fantasy, rodney, mad, teaparty
Figure 3: The Mad Hatters Tea Party. R, Matthews.  (n.d.). Retrieved from http://abstract.desktopnexus.com/wallpaper/255931/
kate greenaway illustration, vintage tea party, victorian girls dress, old fashioned garden party image, child tea party printable
Figure 4: Vintage Tea Party. K, Greenaway. n.d. Retrieved from http://olddesignshop.com/2013/10/vintage-tea-party-kate-greenaway-illustration/


Tea party in nature
Figure 5: Tea Party In Nature. Tjapa2007. (n.d.).  Retrieved from http://www.dreamstime.com/stock-image-tea-party-nature-fantasy-scene-computer-graphics-resting-place-image33381431


Cafes:

As reference I gathered some imagery of outdoor cafes.

Figure 6: Folsom Historic District. California Home Network. 2005. Retrieved from http://folsom.calhomenet.com/historical.htm

This image (figure 6) has made me decide that I definitely do want to go with red for the umbrellas - just as I originally blocked in.  I like the warmth the colour palette of this photo gives.  However I want the cafe to be in a more garden like setting, but one a bit more groomed then the image below (Figure 7).  Of these photo's I had to include Figure 9 for its beautiful fantastical look and lighting, despite that it doesn't really match the feel I am after. 


Figure 7: Amani's garden cafe.  2011. Retrieved from http://amaniyajuunews.wordpress.com/2011/08/11/celebrating-15-years-of-amani-ya-juu-outreach-programs/
Figure 8:  Italy Cafe.  (n.d.) Retrieved from http://shesamaineiac.com/tag/travel/


Naples Cafe in the Evening
Figure 9: Naples Cafe in the Evening. T, Ratcliff. 2006. Retrieved from http://www.stuckincustoms.com/2006/11/23/naples-cafe-in-the-evening/

Friday, 26 September 2014

Puzzle: Character design

Of my puzzle concepts a number of them featured characters.  It also happened that these three ideas were my favourites.  To inform my character design process I looked at a number of articles online.

 Many of these articles recommend researching and finding reference first.  This is sound advice, but in my case I feel that sometimes this limits early creativity- especially if you already have some idea for your character.  Because of this I began my design process by cleaning and expanding on the designs which were already emerging from my puzzle concepts.

All of these characters have a very rounded look.  Usually I would want to challenge this a bit, but for this puzzle I want the characters to appeal to a young audience.  This lead me to try and emphasise the cuter aspects of the characters as I developed them.

  
Figure 1: Character Initial Concepts


For this project the most useful of the articles I found was this one from creative blog, which talks about designing characters based on animals.  

Some advice that I think will be handy in both this project and upcoming ones is to "employ contradictions", "show some teeth", and not "fix proportions" ("Top 40 Character Design Tips", 2013)

“Bring some contradictions to your characters. A vampire with rounded teeth and big, rounded eyes will look cute, and have a different style from what you’d expect. Try to give your creatures accessories to customise them and make them more human-looking.” -- Jacques Bardoux, Illustrator and graphic designer, Paris, France (Cited in "Top 40 Character Design Tips", 2013).

“If you can see a character’s teeth when its mouth is closed, it looks funny. It gives it a goofy look. Use thumbnails to quickly rough out as many variations as you can think of, and use them to work out how the character will look from different angles and with different expressions.” -- Stefan Marjoram, Freelance animation director, Bristol, UK (Cited in "Top 40 Character Design Tips", 2013)

“Experiment with different shapes and proportions. This can transform a character, the classic example being a big head with a small body and limbs – very cute. However, it’s probably more fun to break away from these rules and have fun playing around with different proportions.” -- TADO, Designers and illustrators, Sheffield, UK (Cited in "Top 40 Character Design Tips", 2013)

The other articles I looked at can be read here: 
 
Burgerman, J. (2014). Retrieved from
http://www.creativebloq.com/character-design/tips-5132643

Clarke, J. (2014). Retrieved from http://www.creativebloq.com/3d/how-design-better-creatures-41411337

Mason, D. (2014). Retrieved from
http://www.creativebloq.com/3d/15-pro-character-design-tips-61412006

Top 40 character design tips. (2013). Retrieved from http://www.creativebloq.com/animation/top-40-character-design-tips-part-1-animal-based-characters-5132659

Monday, 22 September 2014

Puzzle Planning

For this assignment we need to create a family friendly puzzle.

First I needed to come up with an idea.  I thought first about the kind of puzzles i had enjoyed as a child.  My favourites were always those that depicted animals or fantastical scenes, so I decided to build upon these themes.

Figure 1: Puzzle Brainstorm

After this I started out by drawing some rough thumbnails.  One of the ideas I had when thinking about harmonious scenes was the tea party.  To develop this further I thought it could be quite an interesting idea to show a dragon relaxing from castle guarding duty with a tiny little tea cup and saucer.

I was also really interested in interactions between characters so I tried to also integrate this in, but continue with the same quirky theme.  I drew a group of sheep trying to have a tea party- an idea I found incredibly amusing when I thought about how difficult it would be to hold tea cups with their feet.

Figure 2: Puzzle Idea Thumbnails

I wanted to explore a few more fantasy ideas so in my other thumbnails I explored ideas like human flight (steampunk wings), treehouses, and a surreal dream-scape with elephant shaped clouds.